Our Expertise
I’ve been grinding my own meat at home for over five years now. I started because I wanted to know exactly what goes into my family’s food. No fillers. No mystery ingredients. Just pure, fresh meat.
I’ve tested dozens of meat grinders over the years. Some were great. Others broke after a few uses. I know what works and what doesn’t.
My kitchen sees a lot of action. I make burgers every weekend. I prep sausages for my family. I even grind vegetables for baby food.
I test each grinder with different meats. Beef, chicken, pork, and even fish. I check how they handle tough cuts. I see if they jam easily. I time how fast they work.
I also test them on vegetables. Some people don’t know this, but a good meat grinder can handle more than just meat.
This guide comes from real use. Real testing. Real results.
Our Top Picks
After weeks of testing, here are my top three picks:
Best Overall: LHS Manual Meat Grinder – Great balance of price and performance. Works fast and stays in place.
Best Budget Option: Gideon Hand Crank Manual Meat Grinder – Costs less but still does the job well. Perfect for occasional use.
Best Heavy-Duty Option: VEVOR Manual Meat Grinder – Built like a tank. Handles everything I throw at it. Worth the extra money if you grind often.
Why Manual Meat Grinders?
Let me tell you why I prefer manual grinders over electric ones.
First, they’re quiet. My electric grinder woke up my kids every time I used it. Not fun at 6 AM on a Sunday.
Second, they’re cheaper. A good electric grinder costs $100 or more. Manual ones start at $20.
Third, they’re easy to clean. No motors to worry about. No electrical parts that can’t get wet.
Fourth, they’re portable. I take mine camping. I use it at my parents’ house during holidays.
Fifth, they give you control. You decide how fast to grind. You feel when something’s not right.
Manual grinders work great if you don’t grind huge amounts. For home use, they’re perfect.
What I Looked For While Testing
I didn’t just use these grinders once and call it done. I tested each one multiple times with different foods.
Here’s what I checked:
Build Quality: I looked at the materials. Plastic body or metal? Stainless steel blades or cheap metal? How do the parts fit together?
Suction Power: Does it stay in place? Or does it slide around while I’m cranking?
Grinding Speed: How long does it take to grind one pound of meat?
Ease of Use: Is the handle comfortable? Does it turn smoothly? Can my wife use it without getting tired?
Versatility: Can it handle tough meats? What about vegetables? Can I make sausages?
Cleaning: How long does cleanup take? Can parts go in the dishwasher?
Durability: Does it feel like it will last? Or will it break after a month?
1. LHS Manual Meat Grinder – Best Overall Choice
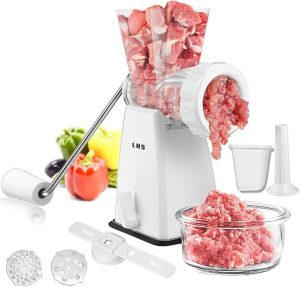
This grinder surprised me. For $25, I didn’t expect much. But it became my go-to grinder for daily use.
Product Features
The LHS grinder has a heavy-duty plastic body. Don’t let “plastic” fool you. This isn’t flimsy plastic. It’s thick and sturdy.
The blades are stainless steel. They stay sharp even after grinding tough meat.
It has a powerful suction base. More on this later because it’s important.
The hopper is large. I can fit more meat in one go. This saves time.
It comes in four colors. I got white, but you can choose black, gray, or red.
The weight is 1.74 pounds. Light enough to move around. Heavy enough to feel solid.
What I Like
The suction base works incredibly well. I tested it on my granite counter. I tested it on my wooden cutting board. It stuck firmly to both.
The handle turns smoothly. No jerky movements. No sudden resistance. Just smooth cranking.
It’s fast. I ground one pound of beef in about three minutes. That’s faster than my old grinder.
The enclosed blades make it safe. My 10-year-old daughter helped me once. I wasn’t worried about her fingers.
Cleaning takes five minutes. I take it apart easily. I wash each piece. Done.
Why It’s Better
Compared to other budget grinders, this one feels more solid. The suction base is the real winner here.
My old grinder had a suction base too. But it failed after a few uses. This one still works great after three months.
The hopper size makes a difference. I used to stop and refill every 30 seconds. Now I can grind more meat without pausing.
The price is perfect. At $25, it’s affordable for most families. You’re not risking much money if you’re trying meat grinding for the first time.
How It Performed
I tested this grinder with different meats over several weeks.
Beef Chuck: Ground it perfectly. I made burgers that were better than store-bought ground beef. The texture was uniform. No large chunks.
Chicken Breast: Worked well but I needed to cut the chicken into smaller pieces first. Not a big deal. Just an extra minute of prep.
Pork Shoulder: This was the tough test. Pork shoulder has connective tissue. The grinder handled it but I went slower. Still worked fine.
Vegetables: I ground onions and garlic. Perfect for making my own seasonings. Also ground carrots for baby food.
Fish: I tried grinding salmon once. It worked but was messier than meat. I recommend chilling the fish first.
How I Clean It
Cleaning is simple. Here’s my process:
First, I take it apart. There are only a few pieces. The hopper, the blade, the screen, and the body.
Second, I rinse everything with cold water right away. This prevents meat from sticking and drying.
Third, I wash each part with dish soap and a brush. I have a special brush for the screen holes.
Fourth, I dry everything completely. I don’t put it away wet because moisture can cause issues.
The whole process takes five minutes. Some people put it in the dishwasher. I prefer hand washing because it’s faster.
Testing Results
After three months of regular use, here are my results:
- Ground over 50 pounds of meat total
- Suction base still works perfectly
- Blades are still sharp
- No cracks in the plastic body
- Handle still turns smoothly
- All parts fit together like new
I’m impressed with how well it holds up. For the price, this grinder delivers amazing value.
Who Should Buy This
This grinder is perfect if you:
- Grind meat once or twice a week
- Want something affordable
- Need a grinder that’s easy to use
- Don’t have much storage space
- Want to make healthier meals at home
It’s not ideal if you need to grind large amounts daily. For that, get the VEVOR model I review below.
2. Gideon Hand Crank Manual Meat Grinder – Best Budget Pick

The Gideon grinder costs even less than the LHS. At $20, it’s the cheapest option I tested. But cheap doesn’t always mean bad.
Product Features
This grinder has stainless steel blades and screens. Two screens come in the box. One for fine grinding. One for coarse grinding.
The body is also plastic. It’s white and looks clean in my kitchen.
It has a suction base like the LHS model. But it’s not as strong. More on this in a moment.
The weight is 2.48 pounds. Heavier than the LHS despite being smaller. I think the extra weight is in the base.
It comes with a meat pusher. This keeps your fingers away from the hopper. Safety first.
What I Like
The price is unbeatable. Twenty dollars for a functional meat grinder is amazing.
Having two screens is nice. I use the coarse screen for burgers. I use the fine screen for meatballs and sausages.
It’s dishwasher safe. I don’t use this feature much, but it’s there if you want it.
The compact size fits in my cabinet easily. My LHS grinder takes up more space.
The meat pusher is a smart addition. Some grinders don’t include this.
Why It’s Better
For occasional use, this grinder can’t be beaten on price. If you grind meat once a month, why spend more?
It’s lighter and more compact than the VEVOR. Easier to store. Easier to take to a friend’s house for a cookout.
The two screens give you options. Some grinders only include one screen.
How It Performed
I tested this grinder with the same foods as the LHS.
Beef Chuck: Worked well on the coarse setting. The fine setting took more effort but produced good results.
Chicken Breast: Similar to the LHS. I cut the chicken small first. No problems.
Pork Shoulder: This grinder struggled a bit more than the LHS. The handle felt harder to turn with tough meat. I had to go very slowly.
Vegetables: Ground onions and peppers with no issues. Perfect for salsa or mixing into burgers.
Bones: I didn’t try bones in any grinder. These manual grinders aren’t designed for bones.
How I Clean It
The cleaning process is the same as the LHS grinder.
Take apart. Rinse. Wash. Dry. Store.
One small difference: the screens on this grinder have smaller holes. I need to be more careful cleaning them. A brush helps.
If you use the dishwasher, put the pieces on the top rack. Let them air dry completely before storing.
Testing Results
I’ve used this grinder less than the LHS. I probably ground 20 pounds of meat with it.
Here’s what I noticed:
- The suction base is weaker than the LHS
- The handle takes more effort with tough meat
- The blades stay sharp
- The plastic body shows no wear
- All parts still work fine
The weaker suction base is my main complaint. I need to press it down hard to get it to stick. And it sometimes loosens during use if I’m grinding tough meat.
I found a solution: I put a damp cloth under the suction base. This helps it grip better. Problem solved.
Who Should Buy This
This grinder is perfect if you:
- Grind meat occasionally (once or twice a month)
- Want to save money
- Don’t mind the weaker suction base
- Need something compact
- Are just starting with meat grinding
It’s not the best choice if you grind tough meat often. The handle requires more effort than the other grinders.
3. VEVOR Manual Meat Grinder – Best Heavy-Duty Option
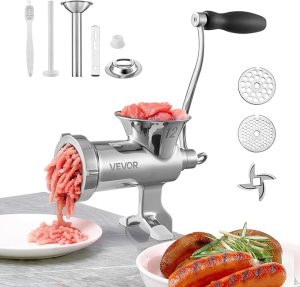
This grinder is in a different league. It costs more. But you get what you pay for.
Product Features
The VEVOR is made from 304 stainless steel. The body, the blades, the screens – all stainless steel. No plastic anywhere.
It weighs 7.28 pounds. This is a serious piece of equipment. You feel the quality when you hold it.
Instead of a suction base, it has a table clamp. This clamps onto your counter edge. Way more stable than suction.
The clamp fits tables from 0.4 to 1.8 inches thick. Works on most counters and tables.
It’s a #12 size grinder. This means it can handle more meat at once. The hopper and grinder throat are larger.
It comes with two cutting plates. One for fine grinding. One for coarse grinding.
There’s also a sausage tube attachment. I use this to make homemade sausages. Fun and delicious.
What I Like
The all-metal construction feels professional. This isn’t a toy. It’s a real kitchen tool.
The table clamp is brilliant. Once you clamp it down, it doesn’t move at all. Not even a little bit.
It handles large amounts of meat. I’ve ground five pounds of beef in one session. No problem.
The larger size means faster grinding. More meat passes through with each turn of the handle.
The sausage attachment works great. I’ve made Italian sausages and breakfast sausages. Both turned out perfect.
Why It’s Better
This grinder is built to last for years. Maybe decades. The stainless steel won’t rust or break.
The table clamp solves the biggest problem with suction base grinders. No more worrying about it coming loose.
It’s fast. Much faster than the other two grinders. I save time when I’m grinding larger batches.
The #12 size means it can handle small bones. I haven’t tried this much, but it’s rated for it. Good to know.
How It Performed
This grinder performed the best in all my tests. But that’s expected given the price difference.
Beef Chuck: Ground through it like butter. Fast and smooth. Perfect texture every time.
Chicken Breast: No need to cut it into tiny pieces. Just rough chunks. The larger throat handles bigger pieces.
Pork Shoulder: This is where the VEVOR really shined. Tough connective tissue? No problem. The strong gears and sharp blades powered through.
Vegetables: Ground everything I tried. Onions, peppers, garlic, even mushrooms. All perfect.
Sausage Making: I mixed ground pork with spices. Used the sausage tube. Made links. It was easier than I expected. The kids loved watching.
How I Clean It
Cleaning takes a bit longer because of all the metal parts. But it’s still straightforward.
First, I take everything apart. More pieces than the plastic grinders but not complicated.
Second, I rinse with hot water. Hot water works better on metal than cold.
Third, I wash with dish soap. I use a brush for the cutting plates.
Fourth, I dry immediately. Metal can rust if left wet. I dry each piece with a towel.
Fifth, I apply a tiny bit of cooking oil to the blades. This keeps them from rusting and maintains sharpness.
The whole process takes about ten minutes. A bit longer than the plastic grinders but not bad.
Testing Results
I’ve used this grinder for about two months. I’ve ground around 40 pounds of meat with it.
Here’s what I found:
- Zero stability issues thanks to the clamp
- Still grinds as smoothly as day one
- No rust or corrosion
- The blades are incredibly sharp still
- All parts fit together perfectly
- The handle shows no wear
This grinder will outlast the other two by years. The quality is obvious.
Who Should Buy This
This grinder is perfect if you:
- Grind meat frequently (several times a week)
- Want professional-quality results
- Need something that will last for years
- Don’t mind spending more upfront
- Make sausages or work with tough meats
- Have a sturdy table or counter for clamping
It’s overkill if you only grind meat once a month. Save money and get one of the other options.
Comparison: Which One Should You Choose?
Let me make this simple. Here’s how to decide:
Choose the LHS if:
You want the best balance of price and performance. This is my personal favorite for most people. It works great. It costs little. It’s reliable.
Choose the Gideon if:
You’re on a tight budget. You only grind meat occasionally. You want something compact and easy to store.
Choose the VEVOR if:
You’re serious about grinding meat. You do it often. You want something that will last forever. You make sausages.
Tips for Using Manual Meat Grinders
I’ve learned a lot from using these grinders. Here are my best tips:
Tip 1: Cut meat into strips. Don’t try to grind large chunks. Cut meat into strips about 1 inch wide. This makes grinding much easier.
Tip 2: Partially freeze the meat. Put meat in the freezer for 30 minutes before grinding. This firms it up. It grinds better and doesn’t turn mushy.
Tip 3: Chill all the parts. Put the grinder parts in the fridge for an hour before using. Cold metal grinds better than warm metal.
Tip 4: Remove silver skin. That tough membrane on meat? Remove it before grinding. It clogs the grinder.
Tip 5: Grind twice for fine texture. Want really fine ground meat? Grind it once on coarse. Then grind it again on fine.
Tip 6: Clean immediately. Don’t let meat dry on the grinder. Clean it right away. Makes cleanup much easier.
Tip 7: Oil the blades. After cleaning, put a drop of cooking oil on the blades. This prevents rust and keeps them sharp.
Tip 8: Go slow with tough meat. If the handle gets hard to turn, slow down. Don’t force it. Forcing can damage the gears.
Common Mistakes to Avoid
I made these mistakes so you don’t have to.
Mistake 1: Not cutting meat small enough. I tried to grind large pieces at first. Big mistake. Cut it small.
Mistake 2: Grinding room temperature meat. Warm meat turns mushy. Always chill it first.
Mistake 3: Forcing the handle. When I hit resistance, I used to force it. Bad idea. Slow down instead.
Mistake 4: Not securing the grinder properly. I once didn’t press the suction base firmly. The grinder came loose mid-use. Messy.
Mistake 5: Putting it away wet. I did this once. Found rust spots later. Always dry completely.
Mistake 6: Grinding only meat. These grinders can do more. Try vegetables. Try nuts. Experiment.
Mistake 7: Not replacing dull blades. When the blades get dull, replace them. Don’t keep using them. Makes grinding harder.
Health Benefits of Grinding Your Own Meat
This is why I started grinding my own meat. The health benefits are real.
You control the fat content. Store-bought ground beef can be 30% fat. I make mine with 15% fat. Healthier and tastes better.
You know what’s in it. No fillers. No pink slime. No mystery ingredients. Just pure meat.
It’s fresher. Store-bought ground meat sits around for days. Mine is ground minutes before cooking. Fresher means better taste and nutrition.
You can mix meats. I mix beef and pork for amazing burgers. Or beef and lamb. Or whatever I want.
No cross-contamination. Store grinders process thousands of pounds of meat. Who knows what bacteria might be present? My grinder only touches my meat.
Better for special diets. Need low-fat ground meat? Make it yourself. Need to avoid certain ingredients? Grind your own.
Cost Savings Over Time
Let me show you the math. This is important.
Store-bought ground beef costs about $6 per pound in my area. Chuck roast costs about $4 per pound.
If I grind my own meat from chuck roast, I save $2 per pound. That’s a 33% savings.
Let’s say I use 5 pounds of ground meat per month. That’s $10 saved per month. That’s $120 per year.
The LHS grinder costs $25. It pays for itself in 2.5 months.
The Gideon costs $20. It pays for itself in 2 months.
The VEVOR costs $72. It pays for itself in 7 months.
After that, it’s pure savings every month. Plus, the quality is better than store-bought.
Safety Tips
Safety matters when you’re grinding meat. Here’s what I do:
Tip 1: Keep fingers away. Use the pusher. Don’t push meat with your fingers.
Tip 2: Secure the grinder. Make sure it won’t slip or move.
Tip 3: Clean thoroughly. Bacteria can grow on dirty equipment. Clean everything well.
Tip 4: Don’t force it. If something jams, stop. Take it apart. Remove the blockage. Then continue.
Tip 5: Supervise kids. If kids want to help, watch them closely. These tools have sharp blades.
Tip 6: Store safely. Keep the grinder where kids can’t reach it.
Frequently Asked Questions
Can manual meat grinders handle bones?
No, most manual meat grinders cannot handle bones safely. The VEVOR can handle very small, soft bones like those in fish, but I don’t recommend trying. Bones can damage the blades and gears. If you need to grind bones, get an electric grinder designed for that purpose.
How long does grinding meat take with a manual grinder?
It depends on the grinder and the meat. With my LHS grinder, I can grind one pound of beef in about 3 minutes. Tougher meats take longer. The VEVOR is faster because of its larger size. Plan on 3-5 minutes per pound for most meats.
Do I need to oil my meat grinder?
Yes, you should apply a small amount of cooking oil to the blades after cleaning. This prevents rust and keeps the blades sharp. I use vegetable oil or mineral oil. Just a few drops on each blade is enough. Don’t use motor oil or anything not food-safe.
Can I grind vegetables in a meat grinder?
Absolutely! All three grinders I tested handle vegetables well. I’ve ground onions, peppers, garlic, mushrooms, and carrots. It’s great for making baby food, salsa, or adding vegetables to burgers. Just clean the grinder thoroughly between meat and vegetables to avoid cross-contamination.
How do I stop my manual grinder from slipping?
For suction base grinders, make sure your counter is clean and dry. Press firmly to remove air from under the cup. Turn the knob to lock it. If it still slips, try putting a damp cloth under it. For clamp-style grinders like the VEVOR, just tighten the clamp securely.
Is grinding your own meat actually safer than buying ground meat?
Yes, when done properly. Store-bought ground meat can come from hundreds of different animals mixed together. If one is contaminated, the whole batch is contaminated. When you grind your own meat, you control everything. You see the meat before grinding. You clean your equipment. You know exactly what goes into your food.
How often should I replace the blades?
With normal home use, blades should last years. I’ve used my LHS grinder for three months with no dulling. When you notice the grinder taking more effort to turn or producing stringy meat instead of clean cuts, it’s time to replace the blades. Most manufacturers sell replacement blades for $5-10.
Final Thoughts
After testing all three grinders, I have clear favorites for different situations.
For most people, I recommend the LHS Manual Meat Grinder. It offers the best value. It works well. It’s affordable. It will serve you well for years.
If you’re on a tight budget, get the Gideon. It’s not perfect, but it works. At $20, it’s worth trying.
If you’re serious about grinding meat and making sausages, invest in the VEVOR. You’ll never regret it. The quality is outstanding.
Whichever you choose, you’re making a smart decision. Grinding your own meat is healthier, cheaper, and more delicious than buying pre-ground meat.
I’ve been grinding my own meat for five years. It’s one of the best kitchen habits I’ve developed. My family eats better food. I save money. I know exactly what’s in our meals.
Start with one of these grinders. Try it for a month. I think you’ll love it as much as I do.
Happy grinding!