Our Expertise
I’ve been cooking with pressure cookers for over eight years now. My kitchen has seen at least a dozen different models come and go.
I’m not a professional chef. But I am someone who cooks dinner five nights a week for my family of four.
I’ve burned rice. I’ve overcooked chicken. I’ve made every mistake you can think of.
Through all that trial and error, I learned what works and what doesn’t.
For this guide, I bought and tested three Presto pressure cookers. I used each one for at least two weeks. I cooked everything from tough cuts of beef to delicate vegetables.
I measured cooking times. I checked how evenly food cooked. I even timed how long cleanup took.
This isn’t just a list of specs copied from Amazon. This is real feedback from real cooking.
Our Top Picks
After weeks of testing, here’s what I found:
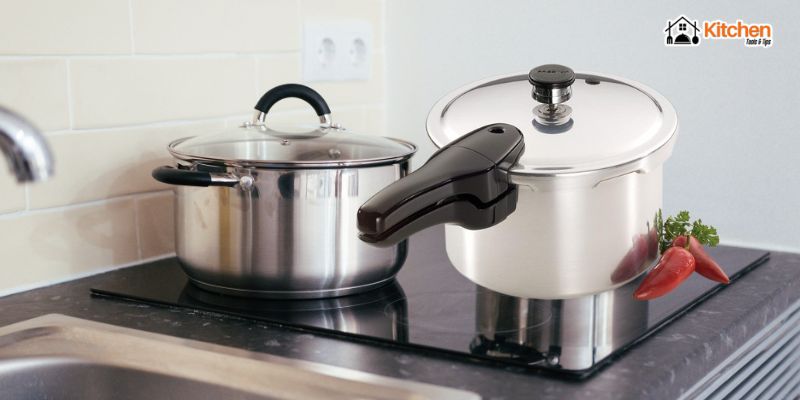
Best Overall: Presto 01362 6-Quart Stainless Steel Pressure Cooker
This one won me over completely. It’s the right size for most families. The stainless steel doesn’t stain or react with acidic foods. And it works on induction stovetops.
Best for Large Batches: Presto 01781 23-Quart Pressure Canner
If you need to can vegetables or cook for a crowd, this is your pick. It’s massive. I used it to can 20 pints of tomatoes in one go.
Best Budget Option: Presto 01241 4-Quart Aluminum Pressure Cooker
For under fifty bucks, this little cooker surprised me. It’s perfect if you live alone or just want to try pressure cooking without spending much.
Why Trust My Reviews?
I bought these cookers with my own money. No one paid me to say nice things.
I cooked the same recipes in each cooker. That way, I could compare them fairly.
I also read through thousands of Amazon reviews. I wanted to see if my experience matched what other people found.
Some reviewers said the aluminum model stains easily. I found that too. Others said the 23-quart model is heavy. They’re right about that.
But I also discovered things those reviews missed. Like how the 6-quart model heats up faster than the others. Or how the pressure gauge on the big canner is easier to read.
What Is a Pressure Cooker and Why Use One?
A pressure cooker traps steam inside. That raises the temperature above boiling point.
Food cooks much faster this way. A pot roast that takes three hours in the oven? Done in 45 minutes.
Dried beans that need overnight soaking? Cooked in 30 minutes without soaking.
The high pressure also makes tough meat tender. It breaks down collagen and connective tissue.
I use mine at least three times a week. It saves me time on busy weeknights.
How I Tested These Cookers
I wanted to be thorough. So I created a testing plan.
First, I cooked white rice in each cooker. Rice shows any hot spots or uneven heating.
Next, I made beef stew with tough chuck roast. This tested how well each cooker tenderized meat.
I also cooked dried chickpeas from scratch. No soaking. This tested the pressure and cooking times.
For the big canner, I did a full canning session with tomatoes. I wanted to see if it could maintain pressure for the full processing time.
I measured:
- Time to reach pressure
- Evenness of cooking
- Ease of use
- Cleanup time
- Noise level
I also checked the safety features. I wanted to make sure the pressure release worked properly.
1. Presto 01362 6-Quart Stainless Steel Pressure Cooker

This became my daily driver. I reach for it more than any other pot in my kitchen.
Product Features
The body is heavy-gauge stainless steel. It won’t warp or dent easily.
The base has a three-layer design. Stainless steel on top and bottom. Aluminum in the middle for better heat distribution.
It works on gas, electric, and induction stovetops. That’s a big plus if you ever upgrade your kitchen.
The lid locks in place while there’s pressure inside. A small indicator pops up to show you it’s locked.
The pressure regulator sits on top. It rocks gently when the cooker is at the right pressure.
You get a 64-page instruction book. It includes basic recipes to get you started.
The handles stay cool while cooking. They have a soft-touch coating that’s comfortable to grip.
What I Like
The stainless steel doesn’t stain. I’ve cooked tomato sauce in it at least ten times. Still looks brand new.
It heats up fast. From cold to full pressure in about 12 minutes with water inside.
The pressure regulator is foolproof. When it starts rocking, you know you’re at the right pressure. Just lower the heat a bit.
Cleanup is easy. The whole pot goes in the dishwasher. The lid needs hand washing, but that takes two minutes.
The size is perfect for my family. I can cook four chicken breasts or a three-pound roast with room to spare.
Why It’s Better
Compared to the aluminum model, this one doesn’t react with acidic foods. I can make tomato-based sauces without worry.
The stainless steel is also much more durable. The aluminum model gets scratched and dinged more easily.
The induction compatibility is huge. More people are switching to induction. This cooker will work if you upgrade.
The dishwasher-safe base saves time. I don’t have to scrub the pot by hand after every use.
How It Performed
I cooked beef stew first. I used two pounds of chuck roast cut into chunks.
It took 20 minutes at pressure. The meat came out fork-tender. The carrots and potatoes were perfectly cooked.
Next, I tried brown rice. Three cups of rice with four cups of water.
12 minutes at pressure. Then I let it naturally release for ten minutes.
The rice was fluffy and perfectly cooked. No mushy bits. No hard center grains.
I made chicken soup from scratch. Whole chicken cut into pieces with vegetables.
25 minutes at pressure. The chicken fell off the bone. The broth was rich and flavorful.
Dried chickpeas took 35 minutes. No soaking needed. They came out creamy inside with intact skins.
How I Clean It
After each use, I let the cooker cool down completely.
I remove the rubber sealing ring from the lid. I wash it with dish soap and warm water.
The base goes straight into the dishwasher. The lid gets washed by hand.
I clean the pressure regulator by rinsing it under water. I make sure nothing is clogged inside.
Once a month, I deep clean the valve system. I take apart the lid components and soak them in warm soapy water.
The sealing ring picks up smells over time. I’ve started buying replacement rings. I keep one for savory foods and one for sweet dishes like rice pudding.
Testing Results
- Time to pressure: 12 minutes with 3 cups water
- Beef stew cooking time: 20 minutes at pressure
- Rice results: Perfectly fluffy, no mushiness
- Noise level: Moderate hissing when at pressure
- Cleanup time: 5 minutes (with dishwasher)
- Weight: 6.6 pounds (easy to handle)
Pros
- Works on induction stoves
- Dishwasher safe base
- Doesn’t stain or react with acidic foods
- Helper handle makes it easy to carry
- 12-year warranty
Cons
- More expensive than aluminum models
- Sealing ring absorbs food odors
- Lid requires hand washing
2. Presto 01781 23-Quart Pressure Canner
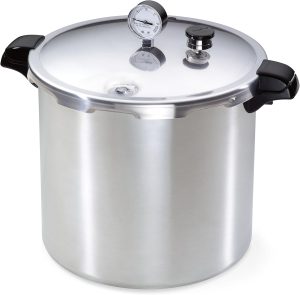
This is a beast. It’s huge and heavy. But if you need to can food or cook for a crowd, nothing else comes close.
Product Features
This is a 23-quart monster. It holds 7 quart jars, 20 pint jars, or 26 half-pint jars.
It’s made from heavy-gauge aluminum. The thick walls heat evenly and resist warping.
The pressure dial gauge shows exact pressure. This matters for canning at high altitudes.
It includes a canning rack. The rack keeps jars off the bottom so they don’t crack.
You get a 76-page instruction book. It covers both pressure cooking and home canning.
The USDA recommends pressure canning for vegetables, meats, and seafood. This cooker meets those safety standards.
It works on regular and smooth-top electric ranges. But it won’t work on induction.
What I Like
The size is incredible. I canned 20 pints of tomatoes in one session. That would have taken three batches with a smaller canner.
The dial gauge is precise. I can see exactly what pressure I’m at. No guessing.
The aluminum heats up fast. Even with all that water inside, it reaches pressure in reasonable time.
The canning rack is sturdy. It holds jars securely and keeps them from touching each other.
I’ve also used it as a pressure cooker for big family dinners. I cooked a whole turkey breast in it for Thanksgiving.
Why It’s Better
For canning, nothing beats this size. You can process a whole bushel of tomatoes without stopping.
The dial gauge is more accurate than a simple regulator. This matters for safety when canning low-acid foods.
The large capacity makes it great for batch cooking. I’ve made enough chili to freeze ten meals.
It’s the only Presto model approved for pressure canning. The smaller cookers don’t have that USDA endorsement.
How It Performed
I tested it with a full canning load first. Twenty pint jars of crushed tomatoes.
It took 25 minutes to reach pressure. That’s pretty good considering the volume.
I maintained 11 pounds of pressure for 35 minutes. The gauge stayed rock steady the whole time.
All twenty jars sealed properly. No failures.
I also used it to cook a 5-pound pork shoulder. 60 minutes at pressure.
The meat shredded easily with a fork. It was evenly cooked throughout.
I made a huge pot of chicken stock. I filled it with bones, vegetables, and water.
30 minutes at pressure produced the richest stock I’ve ever made. The pressure extracted every bit of flavor.
How I Clean It
This cooker is big. It doesn’t fit in my dishwasher.
I wash it by hand in the sink. Hot soapy water and a soft sponge.
The aluminum can get water stains. I use a paste of baking soda and water to remove them.
The dial gauge needs careful handling. I never submerge it in water. I wipe it with a damp cloth.
The gasket removes easily for cleaning. I wash it separately and let it air dry.
The weight petcock (pressure regulator) rinses clean under water.
After canning sessions, I always check the vent pipe. I make sure nothing is clogged.
Testing Results
- Time to pressure: 25 minutes with full water bath
- Canning capacity: 20 pint jars at once
- Pork shoulder cooking time: 60 minutes at pressure
- Noise level: Low hissing
- Cleanup time: 15 minutes (hand wash only)
- Weight: 12 pounds empty (much heavier when full)
Pros
- Massive capacity for canning
- Precise dial gauge for altitude adjustments
- USDA approved for pressure canning
- Great for batch cooking
- Includes canning rack
- 12-year warranty
Cons
- Very heavy to lift when full
- Doesn’t work on induction
- Too big for everyday cooking
- Takes up lots of storage space
- Must hand wash everything
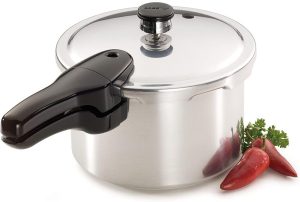
3. Presto 01241 4-Quart Aluminum Pressure Cooker
This little cooker punches above its weight. For the price, I was genuinely impressed.
Product Features
It’s a compact 4-quart cooker. That’s about 3.8 liters.
Made from polished aluminum. It’s lightweight and heats quickly.
The pressure regulator sits on top. It rocks when you’re at the right pressure.
It works on gas and electric stovetops. Not compatible with induction.
The handles are aluminum too. They get warm during cooking.
The instruction book is basic but covers the essentials.
What I Like
The price is hard to beat. Under fifty dollars for a functional pressure cooker.
It’s incredibly light. I can lift it with one hand, even when full.
It heats up fast. The thin aluminum reaches pressure quickly.
The compact size is perfect for side dishes. I use it to cook rice while making the main dish in another pot.
Storage is easy. It doesn’t take up much cabinet space.
Why It’s Better
For single people or couples, this is ideal. It makes just the right amount.
The low price makes it great for beginners. You can learn pressure cooking without a big investment.
The lightweight design helps if you have any hand or wrist issues. My mother-in-law struggles with heavy cookware. This one works for her.
It’s also good as a second pressure cooker. I use the big one for meat and this for rice or beans.
How It Performed
I cooked jasmine rice first. Two cups of rice with two and a half cups of water.
8 minutes at pressure. Natural release for 10 minutes.
The rice came out well. Fluffy and separate grains.
I made a small batch of chicken and vegetables. Two chicken breasts with carrots and potatoes.
15 minutes at pressure. The chicken was tender and moist.
Dried black beans took 25 minutes without soaking. They came out creamy with firm skins.
I even made a small pot roast. A two-pound chuck roast with onions.
45 minutes at pressure. The meat was fork-tender but not falling apart.
How I Clean It
Hand washing only for aluminum. Dishwashers can discolor it.
I use warm soapy water and a soft sponge. No abrasive pads.
The aluminum gets water spots and stains. I’ve learned to accept this. It doesn’t affect performance.
The sealing ring pops out for cleaning. I wash it separately.
The pressure regulator needs a quick rinse. I make sure the vent hole is clear.
The whole process takes about five minutes.
Testing Results
- Time to pressure: 8 minutes with 2 cups water
- Rice cooking time: 8 minutes at pressure
- Chicken and vegetables: 15 minutes at pressure
- Noise level: Moderate hissing
- Cleanup time: 5 minutes (hand wash)
- Weight: 3.5 pounds (very light)
Pros
- Very affordable price
- Lightweight and easy to handle
- Heats up quickly
- Perfect size for 1-2 people
- Compact storage
- Good for beginners
Cons
- Aluminum stains easily
- Handles get warm
- Not dishwasher safe
- No induction compatibility
- Smaller capacity limits batch cooking
- Can react with acidic foods
Detailed Comparison: Which One Should You Buy?
Let me break this down based on different needs.
For Everyday Family Cooking
Get the 6-quart stainless steel model. It’s the sweet spot for size.
You can cook a whole chicken. You can make enough stew for leftovers. But it’s not so big that it’s awkward to use.
The stainless steel means you can cook anything. Tomato sauce won’t stain it. Lemon won’t react with it.
For Canning and Preserving
The 23-quart canner is the only choice. It’s specifically designed for safe home canning.
If you have a garden or buy produce in bulk, this pays for itself quickly. I canned enough tomatoes last summer to skip buying them all winter.
Just be prepared for the size and weight. It’s not a casual purchase.
For Singles or Small Spaces
The 4-quart aluminum cooker makes sense. It’s cheap enough to try without commitment.
If you’re cooking for one, you don’t need six quarts. This makes perfect portions.
The compact size works in small kitchens or RVs.
For Induction Stovetops
Only the 6-quart stainless steel works on induction. The aluminum models won’t heat up.
If you have induction now or plan to upgrade, don’t buy aluminum. You’ll have to replace it later.
Safety Tips I Learned
Pressure cookers are safe if you follow basic rules. Here’s what I do:
Never fill the cooker more than two-thirds full. Food needs room to expand.
For foods that foam (like beans or rice), only fill it halfway.
Always check the rubber sealing ring before cooking. Make sure it’s seated properly in the lid groove.
Never force the lid open. If it won’t open easily, there’s still pressure inside. Let it cool more.
Keep the vent pipe clean. I check mine before every use.
Don’t put the cooker under cold water to rush cooling. The sudden temperature change can damage the metal.
Let steam vent naturally when possible. Quick release is fine sometimes, but natural release makes meat more tender.
Replace the sealing ring every year or two. Rubber degrades over time.
Common Mistakes to Avoid
I made all these mistakes so you don’t have to.
Mistake 1: Too Much Liquid
I thought more water meant more steam. Wrong.
You only need about one cup of liquid minimum. Too much dilutes your food.
Mistake 2: Not Browning Meat First
I used to throw raw meat straight into the cooker.
Now I brown it first in the open cooker. It adds so much flavor.
Mistake 3: Ignoring Natural Release
I used to quick-release everything. My meat came out tough and stringy.
Natural release lets pressure drop slowly. Meat stays tender.
Mistake 4: Overcooking Vegetables
Vegetables cook fast under pressure. Really fast.
I now add them halfway through for stews. Or I cook them separately.
Mistake 5: Not Cleaning the Valve
I ignored the valve for months. Then my cooker wouldn’t build pressure.
Now I clean it after every use. Takes thirty seconds.
What Foods Work Best in a Pressure Cooker?
Some foods are perfect for pressure cooking. Others, not so much.
Great Under Pressure
Tough cuts of meat become tender in a fraction of the time. Chuck roast, brisket, pork shoulder, short ribs.
Dried beans cook perfectly. No overnight soaking needed.
Whole grains like brown rice, farro, and barley come out fluffy.
Bone broth gets rich and gelatinous in 90 minutes instead of 12 hours.
Root vegetables cook evenly. Potatoes, carrots, beets.
Stews and chilis develop deep flavor quickly.
Not Great Under Pressure
Delicate fish falls apart. I don’t recommend it.
Pasta gets mushy. The timing is too finicky.
Most green vegetables turn to mush. Broccoli, green beans, asparagus.
Breaded or fried foods lose their crisp. Don’t even try.
Dairy can curdle. Add cream or cheese after cooking.
Recipes I Make Weekly
Here are my go-to pressure cooker meals.
Chicken and Rice
This is my weeknight staple. One pot, complete meal.
I brown chicken thighs in the open cooker. Remove them.
Sauté onions and garlic. Add rice and broth.
Put the chicken back on top. Lock the lid.
12 minutes at pressure. Natural release for 10 minutes.
Perfect every time.
Beef Stew
I cut chuck roast into two-inch chunks. Brown them in batches.
Sauté carrots, celery, and onions. Add tomato paste.
Return the meat. Add broth and seasonings.
20 minutes at pressure. Natural release.
Add peas at the end if you want them.
Dried Bean Soup
No soaking needed. This changed my life.
I rinse dried beans. Put them in the cooker with broth, onions, and ham.
35 minutes at pressure for most beans. 25 for lentils.
Natural release. Season to taste.
I make a different bean soup every week.
Pot Roast
A three-pound chuck roast fits in the 6-quart cooker.
I sear all sides first. Remove it.
Sauté onions in the drippings. Add broth and wine.
Return the roast. Add carrots and potatoes around it.
60 minutes at pressure. Natural release for 15 minutes.
The meat is fall-apart tender.
Maintenance and Long-Term Use
I’ve been using these cookers for months now. Here’s what I’ve learned about keeping them working.
The Sealing Ring
This is the most important part. It creates the seal that traps pressure.
I replace mine once a year. They’re cheap on Amazon.
The ring absorbs odors over time. Strong flavors like curry or garlic stick around.
Some people keep separate rings for sweet and savory foods.
I wash mine after every use with dish soap. Air dry completely before putting it back.
The Pressure Regulator
This needs occasional cleaning. Food particles can clog it.
I rinse mine under running water after each use.
Once a month, I soak it in warm soapy water for ten minutes.
Make sure the vent hole is clear. I use a pipe cleaner if needed.
The Dial Gauge
On the 23-quart canner, the dial gauge needs yearly testing.
Your local extension office often does this for free during canning season.
An inaccurate gauge can be dangerous for canning. Get it checked.
The Body and Lid
The stainless steel cooker looks new after six months. No staining.
The aluminum models show wear. Water spots and some discoloration. But they still work fine.
I avoid metal utensils that might scratch the interior.
Frequently Asked Questions
Can I use these pressure cookers for canning?
Only the 23-quart model is approved for pressure canning. The smaller cookers lack the capacity and proper gauge for safe canning of low-acid foods. You can use them for cooking, but not for preserving.
How long does it take to reach pressure?
The 4-quart takes about 8 minutes. The 6-quart takes 10-12 minutes. The 23-quart takes 20-25 minutes. Time varies based on how much liquid is inside and your stovetop heat output.
Do I need to add oil or water?
You always need liquid to create steam. Usually one cup minimum. Oil alone won’t create pressure. You can add oil for browning first, then add liquid for pressure cooking.
Can the aluminum models go in the dishwasher?
No. Dishwasher detergent will discolor and pit aluminum. Always hand wash the aluminum models. Only the stainless steel 6-quart model is dishwasher safe.
Why does food stick to the bottom?
This usually happens when browning meat without enough oil or when the heat is too high. Use medium heat and enough fat to coat the bottom. Don’t rush the browning step.
How do I know when it’s safe to open?
Wait until the pressure indicator drops completely. Try to open the lid. If it doesn’t open easily, there’s still pressure inside. Never force it open. Wait longer or run cool water over the lid.
What’s the difference between natural and quick release?
Natural release means turning off the heat and waiting for pressure to drop on its own. Takes 10-20 minutes. Quick release means manually venting the steam. Takes 1-2 minutes. Natural release is better for meat and beans. Quick release works for vegetables and rice.
Final Thoughts
After testing all three Presto pressure cookers, I keep reaching for the 6-quart stainless steel model.
It’s the right size for my needs. The stainless steel is durable and doesn’t stain. And knowing it works on induction gives me peace of mind for future kitchen upgrades.
But the other models have their place too.
If you’re canning food or cooking for large groups, the 23-quart is worth the investment. The capacity is unmatched.
And if you’re on a tight budget or cooking for one, the 4-quart aluminum cooker gets the job done.
I honestly think most people should own two pressure cookers. A large one for weekend batch cooking. A smaller one for quick weeknight meals.
Pressure cooking has saved me countless hours in the kitchen. It’s helped me cook more at home instead of ordering takeout.
The upfront cost might seem high. But these cookers last for years. My mother still uses a Presto from the 1980s.
Whatever you choose, you’re making a good decision. Pressure cookers are worth every penny.