DIY Cupcake Stand With Household Items (Easy & Creative Ideas)
Introduction: Why Make Your Own Cupcake Stand?
You have a birthday party coming up. Or maybe a baby shower. Perhaps even a small wedding celebration.
You want your cupcakes to look stunning. But you do not want to spend a lot of money on a fancy dessert stand.
Here is the truth: you do not need to.
You can build a beautiful cupcake stand right at home. You can use items you already own. Old boxes, trays, wooden boards, or even dollar store finds can become a showstopping display.
This guide walks you through four simple methods. Each one is easy, affordable, and looks great on any dessert table.
What You Need Before You Start
The items you need depend on the method you choose. But most of these are already in your home.
Common supplies you may need:
- Cardboard boxes or thick cardboard sheets
- A tray or flat plate
- Wooden boards or wooden slices
- Glue gun and glue sticks
- Scissors or a craft knife
- Paint or wrapping paper
- Ribbon or twine
- Candlesticks or small cups (for risers)
- Items from the dollar store or dollar tree DIY section
Gather what you have. Then pick the method that fits your style and event.
Method 1 – Cardboard Cupcake Stand
A cardboard cupcake stand is the easiest option. It costs almost nothing. And it looks great when decorated well.
Step 1: Find Strong Cardboard
Look for thick cardboard boxes around your home. Old shipping boxes work perfectly. You need at least three pieces for a tiered look.
Cut three circular or square shapes. Make them different sizes. A good starting guide is 12 inches, 9 inches, and 6 inches.
Step 2: Stack and Secure the Tiers
You need something to lift each tier. Use small cardboard tubes, empty cans, or thick cups. Place one riser in the center of the largest piece. Stack the medium piece on top. Add another riser. Then place the smallest piece at the top.
Use a glue gun to secure each layer. Hold it in place for 30 seconds until the glue sets.
Step 3: Cover and Decorate
Wrap each tier in wrapping paper, fabric, or paint it with acrylic paint. White paint gives a clean, modern look. Brown craft paper gives a rustic cupcake display feel.
Add ribbon around the edges. Use polka dot paper for a birthday party vibe. Use soft florals for a baby shower theme.
Your cardboard cupcake stand is ready to use.
Method 2 – Wooden Cupcake Stand Using Dollar Store Items
This method uses items from the dollar store or dollar tree DIY aisle. It creates a sturdier and more polished wooden cupcake display.
What You Need
- Two or three wooden chargers or flat wooden plates (dollar store)
- Two candlestick holders or small pillar candle holders
- Strong glue or epoxy
- Paint or wood stain
Step 1: Choose Your Tiers
Pick two or three wooden chargers in different sizes. If you cannot find different sizes, use the same size. The height difference from the candlesticks will still create a tiered effect.
Step 2: Attach the Candlesticks
Place one candlestick upside down. Glue the base of the candlestick to the bottom of the top tier. Let it dry fully. This is your riser.
Glue the other end of the candlestick to the center of the bottom tier. You now have a two-tiered wood cupcake stand.
For three tiers, repeat with a second candlestick.
Step 3: Paint and Finish
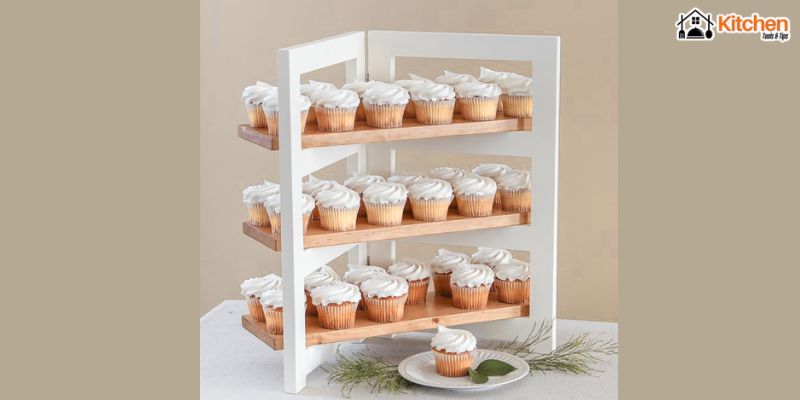
Paint the whole stand in one color for a clean look. White is popular for weddings. Gold works well for birthday parties. Natural wood stain gives a rustic cupcake display that fits farmhouse-style events.
This wood cupcake stand looks like something from a cake decorating shop. But it costs under five dollars to make.
Method 3 – Tiered Tray Stand With Household Items
A tiered tray stand is one of the most versatile options. You can use plates, trays, bowls, or cutting boards. Almost anything flat works.
Step 1: Gather Your Trays or Plates
Look around your kitchen. Find two or three flat items in different sizes. A large tray, a medium plate, and a small plate work well together.
You can also use a mix of items. A wooden cutting board at the bottom. A ceramic plate in the middle. A small saucer on top. The mix adds visual interest.
Step 2: Create the Risers
You need something between each layer to add height. Options from around your home include:
- Upside-down cups or mugs
- Empty tin cans covered in paper
- Thick books stacked and wrapped
- Small bowls placed upside down
For a neater look, use matching items as risers. Three identical mugs look much cleaner than random items.
Step 3: Assemble the Stand
Place your largest tray at the bottom. Put the riser in the center. Balance your medium plate on top. Add the second riser. Place the smallest plate at the top.
If the stand wobbles, use non-slip mat pieces under each tier. This keeps everything steady even when guests reach for cupcakes.
Step 4: Style It for the Occasion
Add a small floral arrangement on the top tier for a wedding cake table display. Use colorful bunting for a birthday party. Tie soft blue or pink ribbon for a baby shower.
A tiered tray stand also works beautifully as a dessert stand for cookies, cake pops, and macarons.
Method 4 – Rustic Cupcake Display Using Wood and Crates
This method is perfect for outdoor events. Think garden parties, barn weddings, or rustic baby showers.
What You Need
- Small wooden crates (dollar tree DIY or from home)
- Flat wooden boards or slices
- Sandpaper
- Wood paint or stain
- Twine or burlap ribbon
Step 1: Sand and Paint the Crates
Sand any rough edges on your wooden crates. Paint them in chalk paint or leave them natural for a raw wood look. Natural wood tones create a warm, earthy rustic cupcake display.
Step 2: Stack and Arrange
Stack crates at different heights. Place the tallest stack at the back. Lower stacks in front. Lay flat wooden boards across the tops to create display levels.
This creates a stepped, multi-level wooden cupcake display that looks incredible at any event.
Step 3: Decorate the Display
Add greenery between the crates. Tuck in small flowers or sprigs of eucalyptus. Wrap twine around the crates for texture. Place a small chalkboard sign on the front for a personal touch.
This style works for both cake decorating displays and full dessert tables.
Decorating Your Stand for Any Occasion
The same stand can look completely different with new decorations. Here is how to style yours.
For a birthday party: Use bright colors. Add balloons, sprinkles, or confetti around the base. Use fun patterned cupcake liners that match the theme.
For a baby shower: Go soft and sweet. Use pastel colors. Add small paper flowers. Tie ribbon bows around each tier. A gentle, delicate look fits the occasion perfectly.
For a wedding: Keep it elegant. Use white, gold, or blush tones. Add real or faux florals. Let the wedding cake sit on the top tier as a centerpiece.
For a rustic outdoor event: Use natural wood, burlap, and greenery. Skip the glitter and go for a simple, earthy feel.
Tips for Making the Best DIY Cupcake Stand
These tips help you get a polished result every time.
Test it before the event. Build your stand a day ahead. Load it with items of similar weight to your cupcakes. Make sure it is stable.
Use non-slip mats. Place small rubber mat pieces under each tier. This stops everything from sliding.
Match the stand to the theme. A dollar tree DIY wooden stand suits a rustic baby shower. A painted white cardboard cupcake stand suits a modern birthday party.
Keep it simple. You do not need lots of decorations. A clean, well-built stand always looks better than a messy over-decorated one.
Make it reusable. Build your stand with glue and care. Store it flat after the event. Use it again next time.
Common Mistakes to Avoid
Building it too tall. A very tall stand looks dramatic but tips easily. Keep your stand at a safe, balanced height.
Using weak cardboard. Thin cardboard bends under the weight of cupcakes. Always use thick, double-wall cardboard.
Not testing stability. Always test your stand with weight before the event. A collapsing dessert stand ruins the moment.
Skipping decoration. Even a simple stand needs some decoration. Plain cardboard with no covering looks unfinished.
Gluing in a rush. Give your glue time to dry. Rushing causes layers to shift or fall apart.
FAQs
Can I make a cupcake stand without glue? Yes. You can stack items without glue. Use non-slip mats between layers to keep everything steady. This also makes it easier to take apart after the event.
What is the best material for a DIY cupcake stand? Wood is the most durable. Cardboard is the easiest and cheapest. Both work well when built carefully and decorated nicely.
How many cupcakes can a homemade stand hold? It depends on the size of your tiers. A three-tiered stand with 12, 9, and 6 inch tiers can hold around 24 to 30 standard cupcakes.
Can I use a dollar tree DIY kit for this project? Yes. The dollar store is a great source for candlesticks, wooden chargers, trays, and small crates. Many dollar tree DIY items are perfect for building cupcake stands on a budget.
How do I make a stand look more professional? Use matching colors throughout. Add ribbon or trim around the edges. Choose a consistent theme. Small details make a big difference.
Can I use this as a dessert stand for other treats? Absolutely. A DIY cupcake stand works just as well for cookies, cake pops, donuts, macarons, and small desserts. It is a versatile piece for any dessert table.
Final Thoughts
You do not need to spend a lot of money to impress your guests. A beautiful cupcake stand is well within reach. You just need a few household items, a little creativity, and this guide.
Start with the cardboard cupcake stand if you are a beginner. Move on to the wooden cupcake or tiered tray methods once you feel confident. Try the rustic cupcake display for outdoor or farmhouse-themed events.
Each method gives you a stunning result. Each one costs very little to make.
Your guests will not believe you built it yourself.