How to Make a Roux: Your Complete Guide to This Essential Cooking Skill
Making this classic mixture is one of the most useful skills in cooking. This simple combination of fat and flour forms the base of many beloved dishes. Once you learn this technique, you can make creamy sauces, thick soups, and rich gravies with ease.
I’ve been cooking for over 15 years. This fundamental sauce base was one of the first things I mastered in culinary school. It changed how I cooked forever. Today, I’ll share everything I know about making the perfect thickening mixture every single time.
What Is This Classic French Thickener?
A roux is a thickening agent used in cooking. It combines equal parts fat and flour. When you cook these two ingredients together, they create a paste that thickens liquids.
Chefs have used this technique in French cooking for hundreds of years. Now, it’s a key part of cuisines around the world. From American mac and cheese to Louisiana gumbo, this mixture makes dishes thick and flavorful.
The beauty of this basic preparation is its simplicity. You need just two ingredients. But the magic happens in how you cook them.
Understanding the Two Key Ingredients
Fat: Your Options
You have several choices for the fat in your mixture:
Butter is the classic choice. It adds rich flavor to your dishes. Most recipes call for melted butter because it mixes easily with flour. A butter flour roux creates the smoothest texture for sauces.
Oil works well too. It has a neutral taste. This makes oil perfect when you don’t want extra flavor. Use vegetable oil, canola oil, or any cooking oil you have.
Some cooks prepare this mixture without butter for dietary reasons. Oil-based versions work just as well as butter roux. The texture stays the same.
Flour: The Thickener
All-purpose flour is standard for this preparation. It has the right amount of protein and starch. This balance creates the perfect thickness.
The flour needs to cook completely. Raw flour tastes chalky and ruins your dish. Cooking removes that raw flavor and activates the thickening power.
The Three Types You Need to Know
The color of your mixture changes based on cooking time. Each type works best for different dishes.
White Roux
The lightest version cooks for just 2 to 3 minutes. It stays pale and looks like wet sand. This is your go-to for cheese sauce and light-colored dishes.
White roux has the most thickening power. Use it when you want thick, creamy results. It’s perfect for making a cheese sauce for mac and cheese.
Blonde Version
Cook your mixture for 5 to 7 minutes to get the blonde version. It turns light tan or golden. The flavor becomes slightly nutty.
This mid-tone option works great for basic cream sauces. It has good thickening power but adds a touch more flavor than the white version.
Brown Roux and Dark Roux
Brown roux cooks for 15 to 20 minutes. It turns chocolate brown. This type has deep, toasted flavors.
Dark roux cooks even longer, up to 45 minutes. It’s almost black. Cajun and Creole cooks use dark roux for authentic gumbo roux. A proper gumbo roux gives the dish its signature taste.
Keep in mind: the darker the color, the less it thickens. Dark versions add flavor more than thickness.
Step-by-Step Instructions for Success
Let me walk you through making a basic butter roux. This recipe serves as your foundation.
What You Need
- 4 tablespoons of butter (or oil)
- 4 tablespoons of all-purpose flour
- A heavy-bottomed pan
- A whisk or wooden spoon
Cooking Instructions
Step 1: Melt Your Fat
Place your pan on medium heat. Add the butter and let it melt completely. If using oil, just heat it until it shimmers.
The pan should be hot but not smoking. Too much heat burns your mixture quickly.
Step 2: Add the Flour
Sprinkle the flour over the melted butter. Start whisking right away. Mix until no dry flour remains.
The combination will look like wet sand or paste. Keep stirring to prevent sticking.
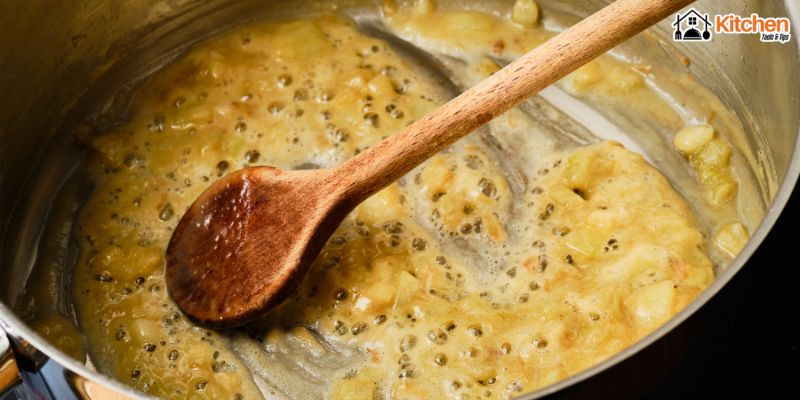
Step 3: Cook and Stir
This is the most important step. Keep stirring constantly. The mixture will bubble gently.
For the white version, cook for 2 to 3 minutes. For the blonde type, cook for 5 to 7 minutes. For the brown version, cook for 15 to 20 minutes.
Watch the color carefully. This mixture can burn fast, especially near the end.
Step 4: Check for Doneness
Your preparation is ready when it reaches your desired color. It should smell toasted and nutty, not burnt.
Remove it from heat immediately when done. The mixture keeps cooking in the hot pan, so act fast.
Using Your Thickener in Recipes
Once your base is ready, you can make countless dishes.
Making Cheese Sauce
The white version is perfect for cheese sauce. After preparing your base, slowly add milk while whisking. The combination will thicken into a smooth sauce.
Then add your favorite cheese. Cheddar works great for mac and cheese. Keep stirring until the cheese melts completely.
This cheese and flour mixture creates the creamiest sauces. No lumps, just smooth goodness.
Creating Béchamel
Béchamel is a classic French sauce. It uses the white version as the base. Add milk slowly to your mixture while whisking.
Season with salt, pepper, and a pinch of nutmeg. This sauce tops casseroles or becomes the base for other sauces.
Making Gumbo
Cajun cooks swear by the dark version for authentic gumbo. The deep color and flavor make gumbo special.
Prepare your gumbo roux with oil instead of butter. Oil handles high heat better. Cook it until it’s dark chocolate brown.
Add your vegetables to the hot mixture. The combination will sizzle and smell amazing. Then add stock to complete your gumbo base.
Tips for Perfect Results Every Time
After years of cooking, I’ve learned some key tricks:
Control Your Heat
Medium heat works best. High heat burns the mixture fast. Low heat takes forever and doesn’t develop flavor well.
A heavy-bottomed pan distributes heat evenly. This prevents hot spots that cause burning.
Stir Constantly
Never walk away while cooking this preparation. Constant stirring is essential. Even 30 seconds without stirring can cause burning.
Use a whisk for smooth results. A wooden spoon works too, especially for darker versions.
Prepare Ahead
You can make this base ahead of time. Let it cool completely. Store it in the fridge for up to a week.
When you need it, just heat it gently and proceed with your recipe.
Add Liquid Carefully
Always add liquid gradually to hot mixtures. Pour slowly while whisking constantly. This prevents lumps.
If your liquid is cold and your base is hot (or vice versa), expect some sizzling. This is normal and actually helps prevent lumps.
Common Problems and Solutions
Even experienced cooks face challenges sometimes.
Burnt Mixture
If your preparation smells burnt or has black specks, throw it out. Burnt thickeners taste bitter and ruin dishes. Start over with lower heat.
Lumpy Texture
Lumps form when you add liquid too fast. If you get lumps, keep whisking vigorously. Most lumps will dissolve.
For stubborn lumps, pour the sauce through a strainer.
Too Thick or Too Thin
If your sauce is too thick, add more liquid gradually. Whisk it in until you reach the right consistency.
If it’s too thin, cook it longer to reduce the liquid. Or make a bit more thickener and whisk it in.
Frequently Asked Questions
Can I make this without butter?
Yes. Use any cooking oil instead. Vegetable oil, canola oil, and even olive oil work well. Oil-based versions have a more neutral flavor than butter-based ones.
What’s the ratio of butter to flour?
Use equal parts by weight or volume. The standard ratio is 1:1. For example, 4 tablespoons of butter to 4 tablespoons of flour.
How long does it last?
Store cooled mixture in an airtight container in the fridge. It keeps for up to one week. You can also freeze it for up to three months.
Can I use this in cheese sauce?
Absolutely. The white version is the traditional base for cheese sauce. Prepare your base first, add milk, then melt in your cheese for perfect mac and cheese.
Why is my mixture grainy?
Grainy texture usually means the flour didn’t cook long enough. Cook your preparation for at least 2 to 3 minutes to eliminate the raw flour texture.
What’s the difference between white and brown versions?
The white type cooks for 2 to 3 minutes and stays light in color. Brown roux cooks for 15 to 20 minutes and develops deep color and nutty flavor. White versions thicken more than brown ones.
Can I make this in the microwave?
Yes, but I don’t recommend it. Stovetop cooking gives you better control over color and texture. Microwave versions heat unevenly and burn easily.
Do I need a whisk?
A whisk works best for smooth results. But a wooden spoon does the job too. Just stir constantly to prevent lumps.
Final Thoughts
Learning this fundamental technique opens up a world of cooking possibilities. This simple thickening agent forms the foundation of so many delicious dishes.
Start with the basic white version for cheese sauce. Once you master that, try blonde and brown variations. Each type brings something special to your cooking.
Remember these key points:
- Use equal parts fat and flour
- Stir constantly while cooking
- Watch the color carefully
- Choose the right type for your dish
Making the perfect butter flour roux takes practice. Don’t worry if your first few attempts aren’t perfect. I burnt plenty when I was learning. Each batch teaches you something new.
Now you have all the knowledge you need. Grab your pan, some butter, and flour. Start cooking today. Your future creamy sauces, rich gravies, and thick soups will thank you.
Happy cooking!