Introduction: Why Make Muffin Liners at Home?
You are about to bake muffins. You open the drawer. No cupcake papers. No cupcake holders. Nothing.
It happens to everyone.
The good news? You do not need to run to the store. You can make muffin liners at home in minutes. All you need is parchment paper or baking paper and a few basic tools.
Homemade liners work just as well as store-bought ones. In some cases, they work even better. Tulip muffin cases, for example, look stunning and hold more batter than regular paper cups.
This guide shows you exactly how to make them. Step by step. No confusion.
What You Need Before You Start
Keep these items ready before you begin:
- Parchment paper or baking paper (non-stick works best)
- Scissors
- A ruler
- A pen or pencil
- A muffin pan or muffin tin
- A small cup or glass (to shape the liner)
That is it. No fancy tools. No special skills needed.
Quick Tip: Always use non-stick parchment. Regular paper sticks to your muffins and ruins the texture.
How to Make Parchment Paper Liners (Step-by-Step)
This is the most common method. It is fast, easy, and works for any muffin tin size.
Step 1: Cut Your Parchment into Squares
Cut your parchment paper into squares. Each square should be about 5 x 5 inches for a standard muffin pan. If your muffin tin is larger, go up to 6 x 6 inches.
You can cut several squares at once. Stack the paper and cut through all layers together. This saves time.
Step 2: Press the Square into the Muffin Cup
Take one square. Place it over one hole in the muffin pan. Push it down gently with your fingers or a small glass.
Press the sides down evenly. The paper will fold and crease on its own. That is normal. Those creases help the liner hold its shape.
Step 3: Hold the Shape in Place
Press a small glass or cup into the center of the parchment square. Hold it there for a few seconds. This helps set the shape.
Remove the glass. Your parchment paper liner is ready.
Repeat this for all the cups in your muffin tin.
Step 4: Fill and Bake
Fill each liner with your muffin batter. Do not overfill. Leave a little space at the top.
Bake as usual. The parchment paper liners hold up well in the oven and peel off cleanly after baking.
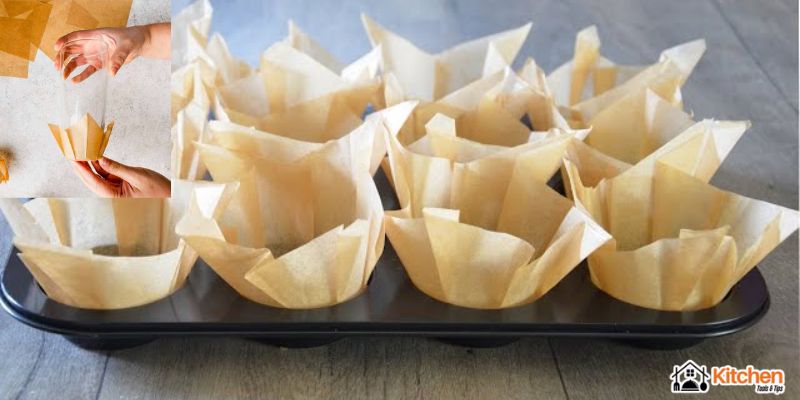
How to Make Tulip Muffin Cases at Home
Tulip muffin cases are a beautiful upgrade. They rise above the muffin pan and give your baked goods a bakery-style look. Tulip liners are perfect for muffins with big tops or lots of fillings.
Here is how to make them at home.
Step 1: Cut Larger Squares
For tulip cupcake cases, you need bigger squares. Cut your parchment paper into 6 x 6 inch squares for standard muffins. Go up to 7 x 7 inches for jumbo muffins.
Step 2: Fold the Square into a Cross Shape
Fold the square in half. Then fold it in half again. You now have a smaller square.
Open it back up. You will see fold lines that make a cross or plus shape in the center.
Step 3: Cut Small Diagonal Slits at Each Corner
At each corner of the square, cut a small diagonal slit. Cut about 1.5 inches long. These cuts are what create the tulip cupcake shape.
Do not cut too far in. Stop before you reach the center fold lines.
Step 4: Press into the Muffin Pan
Place the cut square over a muffin pan hole. Push the center down into the hole. The four cut corners will overlap each other.
Press the sides up against the walls of the muffin tin. The overlapping corners create the tulip shape at the top.
Step 5: Secure If Needed
If the tulip liner keeps popping up, press it down firmly. You can also use a glass to hold it in shape for a moment.
Once you add batter, the weight will keep the liner in place.
Your homemade tulip muffin case is done. It looks professional and works perfectly.
How to Use Baking Paper in a Muffin Tin Without Cutting
Do not have time to cut squares? Here is a shortcut.
You can press a full piece of baking paper directly into your muffin tin. Tear off a piece and press it into the cup with your fingers. It will not look perfect, but it works.
This is a good option when you are in a hurry. The baking paper still prevents sticking and holds the batter in place.
Another option: use strips of parchment. Cut long strips and cross them over each muffin cup. Press down the center. Add batter on top. The strips act as simple cupcake holders.
Tips for Getting the Best Results
Follow these tips to get clean, beautiful results every time.
Use the right paper. Always use parchment paper or baking paper. Do not use wax paper. Wax paper is not oven-safe and can smoke or melt at high temperatures.
Size matters. Cut your squares to match your pan. A square that is too small will not fold properly. A square that is too big will flop over the sides.
Press firmly. The better you press the liner into the muffin pan, the better it holds its shape. Take an extra few seconds to press each one down.
Grease is not needed. Parchment paper liners are naturally non-stick. You do not need to grease them. This saves time and reduces calories in your baked goods.
Make extras. Cut more squares than you need. Store the extras in a zip bag. Use them the next time you bake.
Common Mistakes to Avoid
Even simple tasks have easy pitfalls. Watch out for these.
Using the wrong paper. Many people grab the nearest roll in the kitchen. Make sure it is parchment, not plastic wrap or foil. Foil works in a pinch but can stick to your muffins.
Cutting squares too small. If the square is too small, it will not cover the sides of the muffin cup. Your batter will leak or stick. Always measure before cutting.
Skipping the pressing step. If you just lay the square on top without pressing it in, it will not form a cup shape. Always press it in firmly before adding batter.
Overfilling the liners. Even tulip liners have limits. Fill them about two-thirds full. Overfilling causes the batter to spill and the liner to lose its shape.
Not testing your liner before baking. Before you fill all your liners, do a quick test. Press one in. Does it hold? Does it look right? Adjust if needed.
FAQs
Can I use regular paper instead of parchment to make muffin liners? No. Regular paper is not food-safe or heat-resistant. It can burn in the oven and transfer chemicals to your food. Always use parchment paper or baking paper.
What size should I cut my parchment squares? For a standard muffin pan, cut 5 x 5 inch squares. For tulip muffin cases, go up to 6 or 7 inches. For mini muffin tins, cut 3 x 3 inch squares.
Do homemade parchment paper liners work as well as store-bought cupcake papers? Yes. Homemade parchment paper liners are just as effective. They do not stick, they hold the batter well, and they peel off cleanly after baking.
Can I make tulip liners in advance? Yes. You can cut and fold your tulip muffin cases ahead of time. Store them flat in a zip bag or box. Use them whenever you are ready to bake.
What if I do not have a muffin pan? You can make freestanding liners using tulip cupcake cases. Fold the parchment into a strong tulip shape and place them on a flat baking tray. They hold their shape well with thick batter.
Can I reuse homemade muffin liners? In most cases, no. Parchment paper liners absorb moisture and grease during baking. They are best used once. However, if the liner stays very clean, you can reuse it once more.
How do I stop my liners from unfolding in the oven? Fill them right after pressing. The weight of the batter holds them in place. For tulip liners, make sure the corners overlap fully before adding batter.
Final Thoughts
Making muffin liners at home is simple. You only need parchment paper, scissors, and a muffin pan. The basic square liner takes under a minute to make. The tulip muffin case takes just a little more effort but looks amazing.
Both methods are practical, cost-saving, and easy to repeat. Once you try them, you may never buy cupcake papers again.
Start with the basic parchment paper liners. Get comfortable with the method. Then try the tulip liners for special occasions. You will love the results.
Happy baking.