A messy kitchen drawer wastes your time and energy. You dig through tangled utensils, expired coupons, and mystery items just to find a can opener.
Good news: organizing your kitchen drawers is easier than you think.
This guide shows you exactly how to organize kitchen drawers in seven simple steps. You’ll create a system that saves time, reduces stress, and makes cooking more enjoyable.
Why Kitchen Drawer Organization Matters
Organized drawers make your kitchen more functional. You find what you need in seconds instead of minutes.
Here’s what you gain:
- Faster meal prep and cooking
- Less kitchen stress and frustration
- More usable storage space
- Cleaner, safer work environment
- Better food safety and hygiene
A well-organized kitchen also adds value to your home and makes daily tasks feel effortless.
Step 1: Empty All Your Drawers
Start with a clean slate. Remove everything from your kitchen drawers.
Place all items on your counter or kitchen table. This lets you see exactly what you own.
Work on one drawer at a time if you have limited counter space. This prevents overwhelming yourself with too much clutter.
Step 2: Sort and Declutter Items
Now separate your items into categories:
- Keep (items you use regularly)
- Donate (good condition but rarely used)
- Throw away (broken, expired, or damaged)
Ask yourself these questions for each item:
- Have I used this in the past year?
- Does it work properly?
- Do I have duplicates?
- Does it belong in the kitchen?
Be honest. Most people keep three spatulas when they only need one.
Toss expired food items, broken utensils, and rusty tools. Donate extras to charity or give them to friends.
Step 3: Clean the Drawer Interiors
Wipe down each empty drawer with a damp cloth. Remove crumbs, spills, and sticky residue.
Use warm soapy water for stubborn stains. Let drawers dry completely before adding items back.
Consider lining your drawers with non-slip mats or liners. These protect the wood and make future cleaning easier.
Step 4: Assign Each Drawer a Purpose
Give each drawer a specific job. This creates a logical system you can maintain.
Common drawer categories:
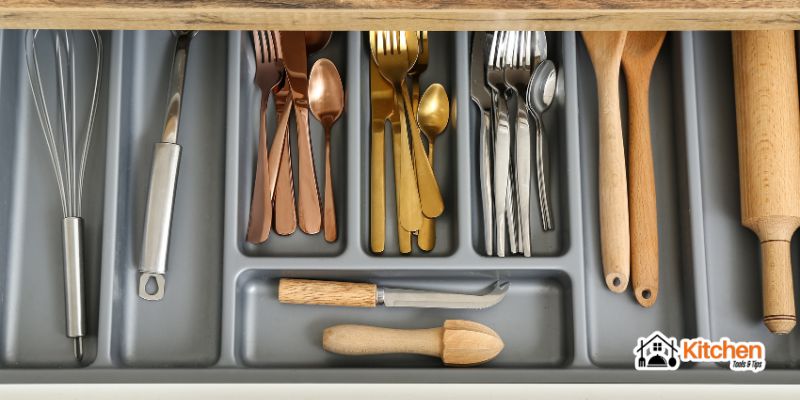
- Cooking utensils drawer: spatulas, wooden spoons, whisks, ladles
- Cutlery drawer: forks, knives, spoons
- Gadgets drawer: can openers, peelers, measuring spoons, timers
- Junk drawer: batteries, pens, notepads, twist ties
- Baking tools drawer: cookie cutters, pastry brushes, piping bags
- Wrap and bags drawer: plastic wrap, aluminum foil, storage bags
Place drawers near where you use the items. Keep cooking utensils near the stove. Store cutlery close to the dishwasher or dining area.
Step 5: Use Drawer Dividers and Organizers
Dividers keep items separated and prevent clutter from returning.
Popular organizer options:
- Expandable drawer dividers
- Bamboo utensil trays
- Plastic drawer organizers
- DIY cardboard boxes
- Pegboard drawer inserts
- Stackable bins
Measure your drawer dimensions before buying organizers. This ensures a perfect fit.
You don’t need expensive products. Small boxes, cups, or even repurposed containers work well for organizing smaller items like bag clips or birthday candles.
Step 6: Arrange Items by Frequency of Use
Place frequently used items in easy-to-reach spots. Put rarely used items toward the back or in higher drawers.
For example, keep everyday forks and spoons in front. Place specialty serving utensils in the back.
Store sharp knives in a knife block or magnetic strip instead of loose in a drawer. This keeps them sharp and prevents injuries.
Group similar items together. Keep all measuring tools in one section. Store all food storage bags in another area.
Step 7: Label and Maintain Your System
Labels help everyone in your household know where things belong.
Use a label maker, chalkboard labels, or simple masking tape. Mark each drawer or organizer section clearly.
Maintain your system with these habits:
- Put items back immediately after use
- Do a quick drawer tidy every week
- Reassess your system every few months
- Remove items you no longer use
A good organization system adapts as your needs change.
Best Kitchen Drawer Organization Ideas
Vertical storage: Stand baking sheets, cutting boards, and pot lids on their side using dividers. This saves space and makes items visible.
Tiered organizers: Use stepped organizers for spices, oils, or small jars. You can see everything at once.
Hidden compartments: Add a shallow tray on top of a deeper drawer. Store frequently used items on top and seasonal items below.
Pegboard inserts: Customize drawer layouts with adjustable pegs. Perfect for awkward-shaped utensils.
Magnetic strips: Attach magnetic strips inside drawer fronts for knives or small metal tools.
Common Mistakes to Avoid
Overstuffing drawers: If you can’t close a drawer easily, you have too much in it. Remove excess items.
Mixing unrelated items: Don’t combine food storage bags with cleaning supplies. Keep categories separate.
Ignoring drawer depth: Use deep drawers for tall items like bottles. Save shallow drawers for flatware and small utensils.
Buying organizers first: Always measure and plan before purchasing storage solutions. Otherwise, they won’t fit properly.
Creating complicated systems: Keep it simple. If your system requires a manual, you won’t maintain it.
Conclusion
Organized kitchen drawers transform your cooking experience. You’ll spend less time searching and more time creating delicious meals.
Follow these seven steps: empty, declutter, clean, assign purposes, add dividers, arrange by use, and maintain your system.
Start with just one drawer today. Once you experience the benefits, you’ll want to organize the rest.
Your future self will thank you every time you open a perfectly organized drawer and find exactly what you need.