What is a Dough Docker in Baking? The Complete Guide
The Baking Tool That Solves a Common Problem
You roll out your pizza dough perfectly. You slide it into the oven. Then you watch in horror.
Giant bubbles puff up on the surface. Your flat crust turns into a lumpy mess.
Sound familiar?
There’s a simple tool that prevents this problem. It’s called a dough docker.
Here’s what it is: A dough docker is a baking tool covered with small spikes. You roll it across dough to make tiny holes. These holes let air escape during baking.
No more bubbles. Just perfect, even results.
Bakers use this docking tool every single day. It’s simple but essential. Once you understand how it works, you’ll wonder how you baked without it.
In this guide, you’ll learn:
- What a dough docker does
- Why it works so well
- How to use it properly
- Which type to buy
- Pro tips from experienced bakers
Let’s start with the basics.
What Exactly Is a Dough Docker?
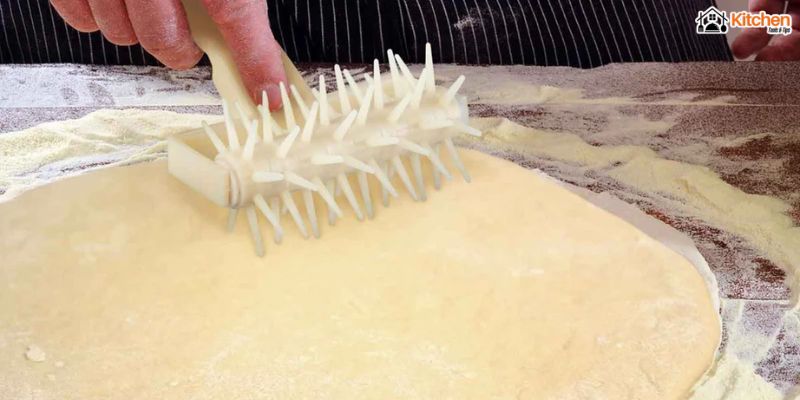
A dough docker looks a bit unusual at first.
It’s a roller covered with short spikes or pins. The spikes stick out evenly all around. When you roll it across dough, it makes lots of tiny holes.
Think of it like a paint roller. But instead of applying paint, it pokes holes.
The Parts of a Dough Docker
Every docking tool has three main parts:
The Roller
This is the spiked cylinder. It rotates as you push it across dough. Most rollers are 2 to 4 inches wide. The spikes are usually made from stainless steel or hard plastic.
The Spikes
These create the holes. They’re short and blunt. Usually about 1/4 inch to 1/2 inch long. They’re spaced evenly around the roller. Most dockers have dozens of spikes.
The Handle
This gives you control. Some handles are wood. Others are plastic or metal. The best ones feel comfortable in your hand. They connect to the roller so it spins freely.
Common Materials
Stainless Steel:
- Very durable
- Won’t rust
- Easy to clean
- Professional choice
Plastic:
- Lighter weight
- Less expensive
- Works well for home bakers
- May wear faster
A Pastry Roller Docker vs. Other Tools
Don’t confuse a docker with other tools.
A dough roller pin is smooth. It flattens dough. It doesn’t poke holes.
A dough cutter slices dough. It doesn’t perforate it.
A pizza roller cuts pizza into slices. Different job entirely.
Only a dough perforator (another name for docker) makes those crucial holes.
Why Is It Called a “Docker”?
The name comes from the action.
“Docking” means making small holes in dough. The term comes from old baking traditions. Bakers have docked dough for centuries.
The process is called “dough docking.” The tool is a “docker.” Simple as that.
You might also hear it called:
- Docking roller
- Pastry docker
- Pizza docker (when used for pizza)
- Dough pricker
All these terms mean the same thing.
How a Dough Docker Works (The Science Part)
Let’s talk about why this tool is so important.
The Bubble Problem
When dough bakes, several things happen:
- The dough heats up
- Moisture turns to steam
- Steam creates pressure
- Pressure looks for a way out
If steam can’t escape, it pushes up. This creates bubbles and bumps. Your flat dough puffs up unevenly.
How Docking Solves This
The docker creates tiny escape routes.
Each hole gives steam a path out. The steam releases slowly and evenly. Your dough stays flat and uniform.
The process works like this:
You roll the docker across raw dough. The spikes poke through the surface. They don’t go all the way through. Just deep enough to break the top layer.
When heat hits, steam escapes through these tiny holes. No pressure builds up. No bubbles form.
Why This Matters
Even baking depends on even thickness.
Bubbled areas cook differently than flat areas. Some parts burn while others stay raw. Toppings slide off bumpy surfaces.
Docking prevents all these problems.
Professional bakers never skip this step. They know it makes a huge difference.
What You Use a Dough Docker For
This baking tool has many uses.
Let me show you the most common ones.
1. Pizza Dough
This is the number one use.
A pizza docker keeps your crust flat and even. This matters for several reasons:
- Toppings stay in place
- Cheese melts evenly
- Crust bakes uniformly
- No burnt bubbles
How to do it:
Roll your dough into a circle. Run the docker across the entire surface. Use firm, even pressure. Cover every inch.
2. Pie Pastry
Pie crusts benefit hugely from docking.
Especially blind-baked crusts (baked without filling). Without docking, pie pastry puffs up like a balloon.
The technique:
Roll out your pie pastry. Transfer it to your pie dish. Dock the bottom and sides. Then add pie weights or filling.
3. Puff Pastry
Puff pastry is tricky.
It’s designed to puff up. But sometimes you want it flat. Like for a tart base or napoleon layers.
Docking controls the puff. More holes = less rise.
4. Flatbreads
Naan, focaccia, and other flatbreads need docking.
You want some texture. But not giant bubbles. Light docking gives you the perfect balance.
5. Crackers
Homemade crackers must be docked.
Look at any commercial cracker. See those little holes? That’s from industrial docking. The holes keep crackers flat and crispy.
6. Tart Shells
Like pie crusts, tart shells puff without docking.
A few quick rolls prevent this problem completely.
The Universal Rule
Any dough you want to stay flat needs docking. If you want it to rise or puff, skip the docker.
Simple as that.
Types of Dough Dockers Available
Not all dockers are the same.
Here are the main types you’ll find.
1. Standard Roller Docker
This is the most common type.
Features:
- Roller is 2 to 4 inches wide
- Handle on one end
- Dozens of evenly spaced spikes
- Works for most tasks
Perfect for home bakers. Handles pizza, pies, and more.
2. Wide Pastry Roller Docker
Professional bakers use these.
Features:
- Roller is 6 to 8 inches wide
- Covers more area faster
- Heavier and sturdier
- More expensive
Great if you bake a lot. Maybe too much for occasional use.
3. Handheld Docker (Jabber Style)
This looks like a meat tenderizer.
Features:
- Small rectangle of spikes
- Short handle
- You jab it repeatedly into dough
- Good for small areas
Works okay. But slower than a roller. Better for detail work.
4. Pizza Docker Specifically
Designed just for pizza.
Features:
- Usually 3 to 4 inches wide
- Spikes optimized for pizza dough thickness
- Often has ergonomic handle
- May have longer spikes
If you make lots of pizza, this specialized tool helps.
5. Dough Perforator with Different Spike Lengths
Some dockers have adjustable spikes.
Features:
- You can change spike depth
- Works for thin and thick doughs
- More versatile
- Usually more expensive
Nice but not necessary for most bakers.
Choosing the Right Dough Docker
Shopping for a docker? Here’s what to consider.
Size Matters
Think about what you bake most.
Small docker (2-3 inches):
- Good for pies and tarts
- Easy to control
- Takes longer for large pizzas
Medium docker (3-4 inches):
- Most versatile size
- Handles most home baking
- My top recommendation
Large docker (6+ inches):
- Professional use
- Covers area fast
- May be awkward for small tasks
Material Quality
Stainless Steel Spikes:
The best choice. Here’s why:
- Won’t bend or break
- Easy to clean
- Lasts forever
- Worth the investment
Plastic Spikes:
These work too:
- Cheaper upfront
- Lighter weight
- May dull over time
- Fine for occasional use
Handle Comfort
You’ll grip this for several minutes sometimes.
Wood Handles:
- Feel natural
- Good grip
- Classic look
- Can’t go in dishwasher
Plastic Handles:
- Easy to clean
- Dishwasher safe
- Can feel cheap
- May crack over time
Metal Handles:
- Very durable
- Professional look
- Can get slippery
- Cold to touch
Spike Configuration
Look at how spikes are arranged.
More spikes = more holes = flatter result
Most dockers have 30 to 100 spikes. For home baking, anything in this range works fine.
Price Range
Cheap dockers cost $5 to $10. Professional ones run $15 to $30.
Mid-range options ($10 to $15) give you the best value. They last years with proper care.
My Top Pick
For most home bakers:
Get a medium-sized docker (3 to 4 inches wide). Choose stainless steel spikes. Pick a comfortable handle.
This combination handles everything you’ll need.
Alternatives to Using a Docker
Don’t have a docker? You have options.
The Classic Fork Method
A fork works in a pinch.
How to do it:
- Take a regular dinner fork
- Poke holes all over your dough
- Space them about 1 inch apart
- Press down firmly
Pros:
- Everyone has a fork
- Costs nothing
- Works reasonably well
Cons:
- Takes much longer
- Holes aren’t as even
- Your arm gets tired
- Results aren’t as consistent
Using a Dough Roller Pin
A regular rolling pin doesn’t dock.
But you can use it with a fork. Roll the dough smooth. Then dock with a fork. Two-step process.
Other Baking Tools
Some bakers try creative solutions:
- Toothpicks (too small, very slow)
- Skewers (awkward to use)
- Brush handle (doesn’t make enough holes)
These work poorly. Not recommended.
When Alternatives Make Sense
If you bake once a month, a fork is fine.
If you bake weekly, buy a docker. Your time and results are worth the small investment.
A proper docking tool costs less than a pizza delivery. But it lasts for years.
Using and Maintaining Your Docker
Here’s how to get the best results.
Proper Docking Technique
Step 1: Roll out your dough to desired thickness first.
Step 2: Hold the docker by the handle. Position it at one edge of the dough.
Step 3: Apply firm, even pressure. Roll across the entire surface.
Step 4: Go in one direction first. Then make another pass perpendicular.
Step 5: Check for any missed spots. Docker them individually.
How Much Pressure?
Push hard enough that spikes go through the top layer. But not so hard you tear the dough.
You’ll get a feel for it after a few tries.
Cleaning Your Docker
After Each Use:
- Rinse under warm water immediately
- Use a brush to clean between spikes
- Pay attention to the roller mechanism
- Dry thoroughly
Deep Cleaning:
Once a month, soak in warm soapy water. Scrub with a stiff brush. Make sure all dough bits are gone.
Storage Tips
Best practice: Hang it on a hook or store in a drawer where spikes won’t get bent.
Avoid: Tossing it in a crowded drawer where other tools can damage the spikes.
When to Replace
A quality docker lasts many years.
Replace it if:
- Spikes bend or break
- Roller stops spinning smoothly
- Handle cracks or loosens
- Rust appears (shouldn’t happen with stainless steel)
Frequently Asked Questions
Do I really need a dough docker?
For occasional baking, a fork works okay.
But if you make pizza, pies, or pastries regularly, a docker makes life much easier. It’s faster, more consistent, and gives better results.
Plus it costs about the same as two pizzas.
Can I use a docker on any type of dough?
Yes, but you don’t always need to.
Docker works on: pizza dough, pie crusts, puff pastry, flatbreads, crackers, and tart shells.
Don’t docker: bread dough (you want it to rise), cake batters, or cookie dough.
What’s the difference between a pizza docker and a regular docker?
Pizza dockers usually have longer spikes. They’re designed for thicker pizza dough.
Regular dockers work fine for pizza too. The difference is minor for home baking.
How do I clean dough stuck in the spikes?
Soak the docker in warm water for 10 minutes. Use a stiff brush to scrub between spikes.
A toothbrush works great for detail cleaning. Make sure you dry it completely after.
Can I put my docker in the dishwasher?
Check the manufacturer’s instructions.
Most stainless steel dockers are dishwasher safe. But hand washing is gentler. It makes your docker last longer.
Wood-handled dockers should never go in the dishwasher.
Your Essential Docking Tool
The dough docker is beautifully simple.
This small baking tool solves a big problem. It keeps your dough flat and even. It prevents bubbles and burnt spots. It helps everything bake perfectly.
Remember these key points:
- Docker any dough you want to stay flat
- Roll in two directions for best coverage
- Choose stainless steel for durability
- Clean it right after each use
- A medium-sized docker handles most tasks
Professional bakers never skip docking. Now you know why.
This humble tool makes a real difference in your results. Your pizzas will be flatter. Your pie crusts will be more even. Your pastries will bake more uniformly.
For less than $15, you get a tool that lasts for years. That makes every baking session easier.
Add a docker to your kitchen. You’ll reach for it again and again.
Happy baking!